
Good morning Dreamers and Blog Hoppers! It is a beautiful, warm morning in Oklahoma and I am so excited to have sun shining in my studio window! Hopefully no more 40 degrees here. We'll see!

Today I am taking part in the Ink Stamp Share Blog Hop. There are many Creative Minds joining together from around the world to bring you some inspiration. I got my inspiration by casing this card from Ludi Bulles. I had to change the recipe to fit Imperial measurements, but had a great time!
I knew the minute that I saw this stamp set that I had to have it! I bought the bundle and love that the punch will even cut out the birds' beak!!! Of course I am talking about the Sweetest Songbirds bundle found on page 31 in the 22-23 Annual Catalog.
Basic White Thick Cardstock 5 1/2" x 11" Score at 4 3/16", 8 1/2"
DSP 4" x 5 1/4" , Cut 2 pieces 2 1/4" x 5 1/4"
Basic White 1" x 8 1/2" , 2 3/4" x 2 3/4", 2" x 2 1/2", 1" x 2"
Crumb Cake 1 3/4" x 2 1/2"
Stampin' Pads
- Sweet Sorbet
- Parakeet Party
- Early Espresso
- Gray Granite
I started by scoring my Thick Basic White Cardstock as listed above. We will be marking, with a lite pencil, the stock after the last score (the small piece!) on each side down 1 1/2" and in the center. I cut from the center dot to the outside dot with my Trimmer, as shown below. Next I marked the center of the DSP and traced the same angle onto it. Cut and repeat for other piece. Glue to card base, centering and making sure the bottom edge is straight. (Yes, I had issues!)

Fold and burnish your base. I will look like an envelope when folded. Adhere DSP to front right of card using Multipurpose glue.
Using the second largest circle from the Stylish Shapes Die and 2 3/4" piece of Basic White, cut out circle with your Stampin Cut & Emboss Machine.
Now, let's stamp the leaves, stem and music notes as shown,
On remaining square piece stamp the large bird and the piece of wing in Sweet Sorbet. Cut her out with punch. Stamp the nest using Early Espresso on the Crumb Cake square and I just fussy cut it out. Stamp your sentiment on small Basic White piece and trim the ends at an angle with your Paper Snips. Glue to lower right
Assemble as shown using Mini Dimensionals and Multipurpose Glue. Make a band from the remaining Basic White strip. Glue embellishment to the center and add some gems if wanted.

The card that I cased finished her insides with the cutest "hand Stitching" and another little bird. 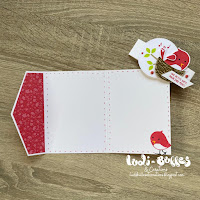 I was afraid that I would mess it up, so my inside it still blank! I have ordered the Stitchery Stamp set (page 54) and will use one of those for my insides when it arrives!
 I was afraid that I would mess it up, so my inside it still blank! I have ordered the Stitchery Stamp set (page 54) and will use one of those for my insides when it arrives!
Thank you for joining me on my leg of the hop. Don't forget to leave a comment!
I'm Dreamin' of this fabulous Annual Catalog....You keep Dreamin' too!
Pammie Kay
Independent Stampin' Up! Demonstrator
Be sure to join the rest of the creators at their hop!
Here are all the products that I used in the above card. Simply click on the picture and you will be magically transported to my web sight to shop! Thank ou for supporting my small business!


Lovely card, great fun fold :-)
ReplyDeleteThank you!
DeleteThis comment has been removed by the author.
ReplyDeleteSuch a sweet little card!
ReplyDeleteThank You.
DeleteI love this bundle and what a great idea, love it.
ReplyDeleteIt is such a cute bundle. I don't usually do "cute"! Thanks
DeleteVery cute x
ReplyDeleteThank you!
DeleteI don't usually do cute either but I have just received this bundle. Great fun fold, I am wondering if it would make a good gift card holder too. xx
ReplyDeleteIt would. In the 70's we had a "card" shaped like this that I would open up and write letters in. I used my sealing wax with my fancy initial stamp to seal it shut! Saved an envelope and was so cute to mail!
DeleteSuch a cute card, I love all the small details, beautiful. Thank you for sharing and hopping x
ReplyDelete